Easter Flat Marble Magnets – Video

Hey Crafters!!  Happy Easter!  I’ve got a fun Magnet craft to share today.  If you’re reading this post in an email, pop over to the blog for the video and scroll down to the bottom of the post.  

 
Peeps bunnies!  
  Chicks!! 
Ducks!?  The beaks are saying, ducks to me.  LOL. 

I had great plans for even more, but ran out of these flat marbles.  I only had 1 bag tucked away and several of them were unusable due to  cracks in the back or pits in the tops, but I had enough to give away to several people.  

The peeps bunnies and little bunnies were from $1.00 stamps by studio g or Inkadinkado, they’ve been out of the packaging for ages.  The ducks are from a new $1.50 crafts art stamp from Michael’s this season.  The carrot from the video is by katie&co. For studio g and the bunny with floppy ears is by Alison Wong for studio g, both $1.00 stamps from seasons past.  

Stamp in Memento Tuxedo black ink, Colored with Copics or Bics, Punched out with a 1 inch Martha Stewart Punch, glued to the back of the flat marbles with Ranger’s Glossy Accents (it’s acid free and dries pretty fast).  I usually leave them to dry overnight.  Then glue the magnets to the marbles with E6000.  You’ll want to let them dry in a well ventilated area, I usually put them at the other end of my craft room, garage or outside.  More specific tips are included in the video tutorial.


Happy Easter!!  Enjoy!

Copic Starfish Card-Kathy Rac-2/19/2016 

Hey Crafters!!  For day 19 in Kathy Racoosin’s 30 Day Color Challenge she was hopping with Simon Says Stamp’s newest Release (winner’s announced Feb. 22) and did some fun Copic colored cards.  I really needed to make a Birthday card for my husband!   And since the grand babies were going to be here Saturday, Friday was my only open window…

  
I tried something new for this card base and did some Copic “water color” and it just didn’t go the way I thought it would.  Very hard to manipulate the color like when you use your markers, but turned out okay in the end after I added Blender Solution to it with a scrap of sweater fabric.   That was after I colored some other starfish die cuts more simply and added blender solution with the scrap of sweater.  (Please be careful with Blender if you are an allergic person, I had to take a Benadryl after using this technique 2 days in a row see more info at the bottom of this post).  

The Video is an easier way, with the same or similar Copic markers!  

   
This was all cut in Canson’s water color paper (9×12 inch pad from Wal-mart Super Center) and doodled on with Copics and a few Bic Mark It’s. 

 
The card stands up and this is how I displayed it without an envelope.  Mike loved it!  He said, it was the best card I’ve ever made him.  It’s also the smallest!  Haha…

A quick video showing how I color the Sizzix Starfish die with Copics and apply blender solution with a scrap of sweater, which gives great texture to your colored die cut. 

Supplies:
Copics: Y13, Y18, Y26, E70, R22, R24, G07, YG25 and Varoius Ink 0 Colorless Blender.  Bic Mark It’s in Black, Tan, fine points dark brown, teal blue,  black.

Addtional Dies: Impression Obsession Mini Shells DIE176-E (these are so cute and emboss lines into the shells as you cut), Quickutz starfish from Relax Boxed set plus Sizzix small clam shell die (only next to the Completed Starfish card at the end of the video), MFT Hibicus (foliage used on the card twice) 815765015899. 

Martha Stewart crab punch in water color paper (super hard to punch, but wanted the heaviness),Copics RV52, RV55, R29, R59, RV66 and Black Bic Mark it for eyes. Glossy Accents on crab eyes and claws. Mini Glass beads in gold used for sand, applied with Glossy Accents.

*Please read the label on your blender solution and act accordingly.  It did cause me some moderate discomfort and reaction issues having used it on 4 cards the previous day 20-24 hours before using it on the 4 starfish die cuts at this sitting. I should have worn rubber gloves to protect myself.   I will not be using this product in the presence of children.  I already caused Millie to have hives last year by bringing in a spray painted door decoration.  You may need to consider pets as well.  

Kathy Rac 30 Day  and Verve Oct 11 2015 Video

Hey Crafters!! It’s Day 11 in Kathy Racoosin’s 30 Day Color Challenge and today is stripes. Click on Kathy’s name to go to her blog post. 


If you’re viewing this post in an email, click over to my blog for the video.  Enjoy!


I’m also combining this with Verve’s, Black White and Glam Challenge, by using their apple dies that coordinate with Teacher’s Count stamp set, but I will be turning my apples into pumpkins. This is a great way to get double duty out of some of your dies.  Visit the Verve Blog by clicking here.  This hop and challenge is open until Nov. 5, 2015.

These are the photos I used for inspiration:

   
Be sure to check out the lovely Maureen Plut’s blog, I won the Teacher’s Count stamp and die set from her blog a couple of years ago and she’s an amazing card artist!  
Supplies: 

Canson Water Color Paper (from 9 x 12 inch pad that Wal-mart sells)

Black Bic Mark It alcohol marker.

C4 Copic Sketch Marker

Scotch Foam Poster Adhesive

Glossy Accents

Verve Apples die

ProvoCraft Rose Wreath Die and embossing folder

Chunky Silver Glitter

Fine White Iridescent Glitter

Recollections Gray 65 lb Card Stock for 4 1/4 x 5 1/2 inch card base

The Paper Studio Heavy Weight White Card Stock

Candelabra stamp by craft smart from $1.00 bin at Michael’s this Fall season

Happy Birthday Sentiment from Close to My Heart retired Happy Birthday Set

Ranger Archival Jet Black 

Farm Party and Card Video

Hey Crafters!! The beginning of today’s video is a photo montage of my grand baby’s 3rd birthday party decorations, including the paper crafted cup cake toppers, food signs, name banner, WR Memory Keepers pin wheels, lunch bag treat bags and fun foam farm masks.  Then the making of her Farm Card and small discussion about the use of Eileen Hull’s 3D canning jars die for some mini candy bars.


Stamp sets: Salt Box Studio Farm Friends, Just Rite Stampers font, Katie & co. 2011 Rooster, Lawn Fawn Baked with Love (little pile of flour), Stampin’UP! Country Morning (envelope).
Copic & Bic alcohol markers detailed in the video.  
Memento ink and Misc. Stampin’UP! Classic inks for the treat bags.  

Spellbinder Blossom and Sizzix Banner dies.

Embossing Folders: Sizzix Fall Set-Fall Fence, SU Vintage Wall Paper.

Enjoy!  Thanks for watching and sharing my love of crafting.

-I’m so sorry the quality of this video is so poorly after editing with iMovie and uploading to YouTube via the Capture app.  I’ve made some setting changed that are going to make using these products even more painful and slower than they already are.  I may end up having to invest ina proper camera!  Or try filming and editing direcctly from the Capture app.  

Preparing/Coloring Cup Cake Toppers

Hey Crafters!!  It’s Day 14 in Kathy Racoosin’s 30 Day Color Challenge, June 14, 2015, and today was Copics!  Yay!!  That is right in line with what I colored today.  My fabulously crafty Daughter, Katie, came over today to craft for Millie’s upcoming 3rd birthday.  She die cut a shape from a Spellbinder’s nested set and stamped farm animals from a Salt Box Studio “farm” stamp set and I colored them with Copics and Bics.  I love these crafty days, where we are working together and visiting.  I love that she has this crafty side too!

This cute cow also adorns our Birthday Invitations, created before Kathy’s challenge began.  
The rooster, which I’m never sure how to color!  But I like how he turned out. 
The pig, I should have gone back and tried to smoothe him out.  You can really see the Bic marker lines and the continuos oval in which I colored him!  But by the time we were finished, I was ready to be done. I was afraid my lightest pink Copic would wash him out to much. And I reassured myself no one will notice in the whole scheme of things. LOL  
These are the colored fronts.  She will be gluing the Wilton candy disc “sticks” for making suckers with sucker molds, to these fronts and has cut another die cut of the same size and shape, but in a solid color card stock to glue to the backs to conseal the sticks.  Oh, they are going to be so cute!!  I can’t wait for our party, when it all comes togther.  She is also making a PIG pinata and I will be sure to share a post with all of our craftiness next week.

Supplies:

Salt Box Stiudio ? possibly called Outstanding in Your Field (LOL), which is one of the sentiments in this set, which I think is hilarious.  (I’ll look and see tomorrow at a decent hour and perhaps update this info.)

Spellbinders Nested Flower or Bloom set (I may have to pop back in and edit this).

Markers: Copics, Bic Mark Its and Sharpie fine line Black marker.

Coloring Die Cuts, Day 11 Kathy Rac’s Challenge

Hey Crafters!!  I’ve missed a few days of Kathy Racoosin’s 30 Day Color Challenge 2!  Be sure to visit her blog and play in this no fuss, no stress, just have fun coloring challenge…..to…..color something every day!  I’ve missed a few days, but that’s the beauty of being able to jump in on any day and play.

I’m pairing today’s coloring with a birthday banner project for my grand baby turning 3 this month.  We are doing a farm theme and I’ve die cut some farm animals and enhanced them with alcohol markers, easy peasy!

Click over to my blog for  a video at the bottom of this post, discussing the journey  of making these cute die cuts.  

Cow & Pig: 


Rooster & Chicken w/eggs (I altered both of these dies by removing blades that made the head/feet/top knot floppy)   *Please Note, if you “work on”  or Alter your dies, it VOIDS the Warranty, but I’ve had these dies for more than the 3 year warranty period, so I’m okay with that.  I’ve just reached a place in my crafting that, if a die isn’t working properly for my needs, I’m going to fix it or make it more user friendly.


To make these die cuts show up on the white panel of the banner, I backed them with gray card stock and loosely cut around them with small scissors.  I like to go ahead and semi-seperate the die cuts and fine tune them, this just makes them easier to handle with little scissors. 😉


Supplies:

Dies:  Provo Craft Pig, Sizzix Sizzlit  Jumping Cow, Sizzix Medium Rooster & Chicken  w/Egg.  Sizzix Pro Album Layered Ribbon Banner die (cut in Stampin’UP! for the base and Heavy White by The Paper Studio). 

Heavy weight White card stock by The Paper Studio (from Hobby Lobby)  for every farm critter, except the pig (cut in scraps of Recollections 65 lb. card stock).   Misc. Gray card stock loosely cut around each critter, so they show up well on the white portion of the banner.

Alcohol Markers in various colors from Copics and Bic Mark Its and a Sharpie fine liner black marker.

A Couple of Personalized Tags 2014

Hey Crafters!! A couple of years ago I made some cute tags with the large Crescent Tag die. I made each one for each family member’s gift, excluding myself. And they were totally fun and I will add a few pics at the bottom of this post.

My daughter, Katie, saved her and Cody’s tags, this was before Millie was born. As I noticed Katie’s Christmas stockings out this year, she had hung their tags with their stockings and she even made tags for the puppy dog’s stockings too. Everyone had a tag with their stocking, except Millie and Nic. So, I got to work and created tags for Millie and Nic.

Katie and Millie picked out some cute felt cupcake decorations for their Christmas tree and Katie requested a cupcake tag for Millie. I was at a bit of a loss, even though I have a couple of cupcake dies! I’ve just been too frazzled to settle down and create much, but I (Nana), do have Cup Cake Lady in my car and she has helped us through many a tough acid reflux day or Card Class day, where I was asked last minute to teach class. Millie would go with me and Cup Cake Lady (whom is really an ice cream cone) would entertain Millie with her dancing and floppy arms and legs with cute green shoes, until her Mama came to pick her up about 30 minutes into class. She was the perfect inspiration, although Cup Cake Lady is much cuter than my Millie tag!! But this tag was Millie approved. Whew!

IMG_6093.JPG
I have no idea how I ended up calling this funny ice cream cone, Cup Cake Lady, but it’s stuck and we love her. So, it’s okay and we’re rolling on. HaHa!

IMG_6092.JPG

She was die cut from the Sizzix Pro Cup Cake/ pocket die, that I hand trimmed a bit too to try and get the shape of Cup Cake Lady, the cherry is from this die too. I used Copics and Bics to make the dots for the sprinkles. The arms and legs are white gross grain ribbon, that I also dotted with alcohol markers, which bled a bit, but I rolled on. The shoes were die cut from a Sizzix Halloween Witch accessories die that I also hand trimmed to mimic Cup Cake Lady’s real shoes. The socks were hand drawn and fussy cut from white paper and dotted as well. The hands are PTI Signature Series Snowman die set (the mittens for the snowman). A ginger bread man was stamped and die cut from a Stampin’UP! set and added to her hands.

IMG_6091.JPG
The Quikutz Bouquet alpha set was used to cut the letters for Millie and shadowed with a darker color to make them pop.

Onto Nic’s tag. Nicholas…which I abbreviated as Nic. Katie questioned my decision and I’ve not heard back, so I hope it’s right. ;0 LOL Nic is going to school to write and conduct scores of music for movies, which I think is totally cool. He’s Cody’s best friend and he’s so engaging, when you meet him every single time, which I really like too. He went to Pumpkin Daze with us in Republic, MO this year and he wore a sock hat and a sweater, so I pulled inspiration from that experience, his love of music (so I knew I had to make sheet music that was a given, that I also stamped with some Christmas music titles) and Katie said he used to play the upright Base. These are the kind of people I love creating a paper craft for! All of the guess work is done. DONE. Just have fun creating. I took the new guitar die I bought this Summer from Joy crafts and a large guitar stamp from a Hanna Montana Disney stamp set used for gauging size and created an upright base template. The handle or neck and strings area are from the guitar die cut 2 times to elongate the neck and I the body of the Base was hand drawn and cut from water color paper for sturdiness (based on an image I googled for an upright base). I think it turned out awesome, and I doodled on it with some Copics and Bic alcohol markers. Love it!

IMG_7339.JPG
The scarf, hat, shirt, pants and boots came from a Sizzix Dress ups die, Winter clothes. I often alter this “coat” and make it into a shirt for my masculine paper crafting, by cutting the feminine or childish curves off of it. I ended up using the Quikutz dress up body die for the body, and actually cut the arms apart and the legs apart to place them where they looked natural with my over sized upright base. And I love how this tag turned out! The greenery and berries was from an awesome craft store dumpster dive, amidst many rolls of ribbon, beads, etc. and I turned a small length of it into a wreath and stitched it onto the tag with some thick twine. The final finishing touch are the tiny jewelry tags, made from the SU jewelry tag punch, and stamped with small words, (Holiday, Hugs, Special, Just, For, You), each with a hole punched in the rounded tip with a straight pin and threaded onto a tiny safety pin.

Here are a few peeks from the original tags. Katie thought I got a bit carried away for the 2 newer tags. LOL What? What?

IMG_6086.JPG

IMG_6084.JPG

IMG_6085.JPG

September 2013 Name Tags

Hi Crafters!! Can you believe September is already here?! My heart goes out to all those affected by 9-11. I can’t believe it’s been 12 years. Seems like yesterday, really. My husband had called me to turn on TV and my heart sank when the first tower went down. I knew in an instant all those lives were gone and I immediately wondered about their salvation. And then the other tower went down. I tried to call my parents for reassurance, and they were on the road on vacation, and had no idea. My father lost 1/3rd of his retirement that day, which is nothing compared to the people who lost their people, friends….family….loved ones. I spent the day flitting about my house because I didn’t know what else to do. And I prayed, cried and prayed. My husband told me to go fill my car with gas and it was complete insanity at the gas pumps. People forgot their manners, cut in line and acted as if they were the only ones there. Scary. And then those who gave their lives to save others…..the most unselfish gift of courage ever. One of my best childhood friends lives in a suburb and works in NYC. I tried to call her later, but she knew people who were in the towers and couldn’t function. Although, I have no one involved, I still can not sit and watch it on TV, or the movies, my emotions take over and all I can do is cry and sob. I have to leave the room. And all of the service men and women who have given their lives on top of that. So much courage, sacrifice and heart ache from the war. My children were both saved after mass tragedies involving children. Now that I’ve had my cry for today, lets get to the name tags.

Watch my Video Here

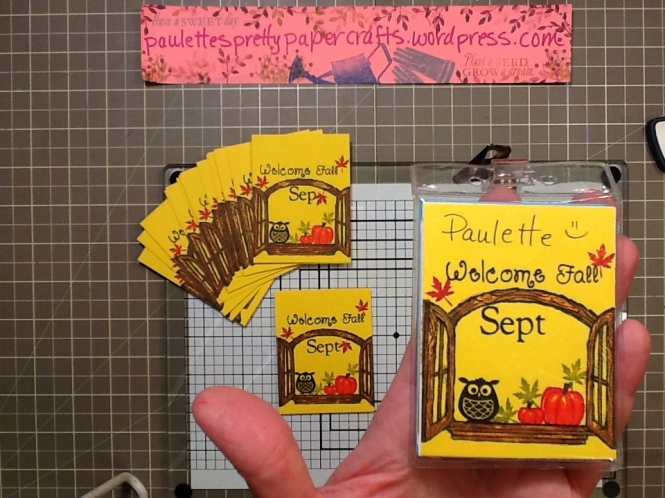
I cut my cards at 2 1/2 inches by 3 1/4 inches to fit in the @TheOffice, clear vinyl name tag holders, from yellow card stock. The window was stamped in Memento Black and colored with peach and brown Bic Mark It alcohol markers. The pumpkins were stamped in StazOn Red ink and carefully colored in with Yellow and Orange Bic markers (as to not pick up the red ink with the marker…Memento ink would have been better here), the stems were colored over with dark green marker. The sentiment, month and owl were stamped with Ranger’s Archival Black ink. The leaves were stamped with Stampin’UP! Old Olive and Real Red. Then we just hand write our names with an ink pen, this month I used a Sharpie fine point black marker to write my name (I love this little marker).

20130912-124652.jpg
I know, I was so surprised to get 2 whole name tags colored within YouTube’s 15 minutes, and then the red leaves that had to be added due to the extra mark left by the e from the September stamp. LOL I seem to have these errors when the project is almost complete!! And I’m too tired, or have too much time invested to start over, so I just ROLL ON. As a baby from the early 60’s, it’s how I Roll. haha Waste not, Want not, right? That is what I love about painting too, you can always cover your boo boos with more paint. Thank Goodness, the same holds true for stamping, in most cases.

July 2013 Name Tags

Hi Crafters!! Here are July’s name tags. Stamps used were Papertrey Ink’s Vintage Picnic (plain picnic basket-July basket filler-July sentiment), Tim Holtz City Central (strip of stars). Basket and July filler was stamped in T. Memento black ink, Sentiment and Stars were stamped in Ranger Jet Black Archival ink. Basket was watercolored in SU’s Night of Navy diluted with water. July filler (flags and stars) were water colored with Bic Mark it Markers in Tan, Red, Blue. Hinge brad on basket in Gray marker. One star was partially color in a dark blue highlighter. No corner punching or sponging on this month’s tag. Enjoy! Video is Here

<a

20130802-113247.jpg
This is how I cut my 8 1/2 x 11 inch card stock to get the most mileage out of it.
Cut @ 2-1/2 inches in the Portrait mode until you are at the end of the card stock.
Now, rotate those strips and cut them @ 3-1/4 inches in the Landscape mode until you are at the end of the card stock. If you’re thrifty, like me, you can use the “waist” pieces for sentiment strips.

20130802-113116.jpg

April 2013 Card Supply Haul

Hi Crafters!! This is April’s Haul featuring the Tim Holtz Alterations Sizzix 1/4 inch magnetic hole punches die set, Stampin’UP! Apothecary Art Stamp set, Provo Craft Cuttlebug Extended C cutting plate, Bic Sharpie fine point marker and some Silver Sequins. Haul Video Here

There is also a video showing how easy it is to color the Apothecary Art image with the Roses and leaves. This turns out beautiful every time! I adore this set and with the matching dies, it makes lovely shaped greeting cards. I gave sets of these cards to family at a recent reunion, in bright colored card stock, Red cs with Pixie Pink and Real Red roses, Dark Blue cs with Night of Navy roses in very diluted Night of Navy and dark NON ink, Rich Razzleberry cs with Rich Razzleberry in a diluted version and a more full strength version, Bright Pink cs with Pixie Pink and Real Red roses, Yellow cs with Daffodil Delight and Pumpkin Pie roses, Teal cs with Tempting Turquoise roses in a diluted version and a more full strength version. This is so fool proof, you will love it as much as I do. Simply use your lighter or very diluted version of ink color, then come back when it’s dry and add a darker color or a more full strength version of the same color ink on the dark areas of the stamp that the stamp designer has already marked for you with textured lines within the image, like the places between the petals and near the base of the roses. Aqua Painting the Apothecary Art set

20130709-120440.jpg
I also purchased several of the Recollections cubes for organizing card making supplies, while they were 60 or 70% off at Michael’s, the ribbon cube-3 drawers, the card storage cube-2 drawers with dividers and a 3 drawer cube for misc. We are renovating our spare room into the washer/dryer/sewing room and I will be rearranging my craft room soon when my sewing cabinet goes there. I will be back to share my new and old storage cubes.

20130709-121202.jpg
Here is a sneek peek of the new sewing room, this used to be an outside window that has been transformed into a nice shelf. I will be putting my Craft Books and Cook Books here. This room has a country white paint on the walls now, I chose a deep mocha brown color for the walls and a crisp bright white for the base boards and can’t wait to get it up on the walls.

20130709-121431.jpg
An extra dining room table that I will be using to spread my patterns out for pinning and cutting and you can see a small glimpse of the pretty linoleum we chose for this laundry/sewing room.

20130709-122918.jpg
Some old cabinets from the old kitchen that used to be dark brown formica, I think they will be painted in the same white as the baseboards. =D

20130709-123355.jpg

20130709-151603.jpg