DIY Faux Fishing Bobbers Christmas 2015

Hey Crafters!!  I’ve created some fake deep sea fishing bobbers from some scraps of 4 X 4 inch wood.  I see these at Hobby Lobby and I think, I can make those!  LOL  And if I had a job other than Day Care for my grand babies, I’d just buy them.  

  
If you’re reading this post in an email, pop over to my blog for the video at the bottom of this post.

   
A couple of random scraps.  I cut the end of of them with the miter saw, so I would have 2 of varying heights. 

 My very technical way of measuring with a ruler thingie I found on the miter saw and a couple of scraps of wood.  LOL  Hey, whatever works, right!?  Marked one corner on each side with a carpenter pencil, cause’ that’s what was there.  

 I did have to move the saw blade to match the pencil marks on my blocks.  And made one cut on each side of the blocks; 4 sides = 4 cuts per block.  My sone was gracious enough sand them down and shape them for me on a belt sander.  Plus, drill the large hole and glue in the dowels.  

 I really meant to paint the tall bobber red, blue and yellow.  My yellow paint was too old and chunky, so I ended up mixing in some yellow and got that pea green and I rolled on.  And I meant to paint the short one blue and yellow.  LOL. It is what it is.  Too little time and too many things to get done while on cold medication.  I also used the heat tool to speed up drying time between bands of color.  The heat tool bubbled the paint, which was awesome for a more distressed look when I got around to the sanding with an electric hand sander.  After sanding and dusting them off, I clear coated them with clear spray paint 2 times.  And thinned down some brown paint to write on the bottoms, to Mike from Paulette Christmas 2015, with Jon’s help and Katie hosting Christmas.  So, we can look back and remember.


And look, I made another ring thing with a small Sizzix she’ll die.  This time I cut my card stock to 6 X 6 inches since the die was so small ( 2 X 2 inches) and it worked!  Eeeeeeee! (Happy Sound). A couple of Martha Stewart crab punches.

 Here is what it looks like all wrapped up!  A great gift for my Wonderful husband from the Pacific Ocean.  Perfect!!  And I saved this tag special for him.  ;).  Merry Christmas!!

Supplies:

4 X 4 ” scrap wood

Miter Saw, measuring thingie, pencil.

Belt Sander & Drill Press (compliments of my son).  Electric hand sander (also from my son).

Acrylic Paints

Clear spray paint
Crafty paint brushes

Painter’s Tape

Leather strips

Card stock scraps

Copics:  RV69, R29 

Bic Mark it:  Black.
September 2013 Name Tags

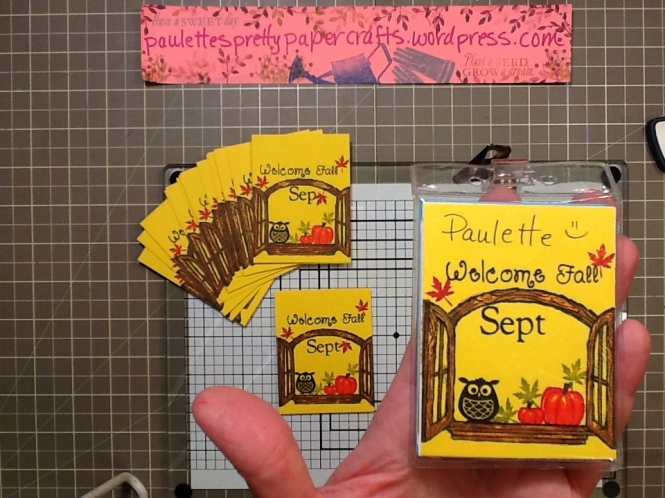
Hi Crafters!! Can you believe September is already here?! My heart goes out to all those affected by 9-11. I can’t believe it’s been 12 years. Seems like yesterday, really. My husband had called me to turn on TV and my heart sank when the first tower went down. I knew in an instant all those lives were gone and I immediately wondered about their salvation. And then the other tower went down. I tried to call my parents for reassurance, and they were on the road on vacation, and had no idea. My father lost 1/3rd of his retirement that day, which is nothing compared to the people who lost their people, friends….family….loved ones. I spent the day flitting about my house because I didn’t know what else to do. And I prayed, cried and prayed. My husband told me to go fill my car with gas and it was complete insanity at the gas pumps. People forgot their manners, cut in line and acted as if they were the only ones there. Scary. And then those who gave their lives to save others…..the most unselfish gift of courage ever. One of my best childhood friends lives in a suburb and works in NYC. I tried to call her later, but she knew people who were in the towers and couldn’t function. Although, I have no one involved, I still can not sit and watch it on TV, or the movies, my emotions take over and all I can do is cry and sob. I have to leave the room. And all of the service men and women who have given their lives on top of that. So much courage, sacrifice and heart ache from the war. My children were both saved after mass tragedies involving children. Now that I’ve had my cry for today, lets get to the name tags.

Watch my Video Here

I cut my cards at 2 1/2 inches by 3 1/4 inches to fit in the @TheOffice, clear vinyl name tag holders, from yellow card stock. The window was stamped in Memento Black and colored with peach and brown Bic Mark It alcohol markers. The pumpkins were stamped in StazOn Red ink and carefully colored in with Yellow and Orange Bic markers (as to not pick up the red ink with the marker…Memento ink would have been better here), the stems were colored over with dark green marker. The sentiment, month and owl were stamped with Ranger’s Archival Black ink. The leaves were stamped with Stampin’UP! Old Olive and Real Red. Then we just hand write our names with an ink pen, this month I used a Sharpie fine point black marker to write my name (I love this little marker).

20130912-124652.jpg
I know, I was so surprised to get 2 whole name tags colored within YouTube’s 15 minutes, and then the red leaves that had to be added due to the extra mark left by the e from the September stamp. LOL I seem to have these errors when the project is almost complete!! And I’m too tired, or have too much time invested to start over, so I just ROLL ON. As a baby from the early 60’s, it’s how I Roll. haha Waste not, Want not, right? That is what I love about painting too, you can always cover your boo boos with more paint. Thank Goodness, the same holds true for stamping, in most cases.

Onesie Stamping with Fabric Stamps

Hi Crafters! In the Fall, I stamped a package of Carter’s Onesies with some Plaid craft paint and Plaid foam fabric stamps. You can purchase acrylic paint colors you need, or you can mix what you have, like I did. Either way, it’s a fun craft to do and it allowed me to make onesies that would match the little baby pants I had on hand.

Typically you would wash any new fabric item to remove sizing that is added to the fabric, but I wanted to save myself a step and I washed mine when they were done, just to make sure they were nice and soft for baby to wear. I love how they turned out. Since I did not pre-wash the onesies, they were still nice and smooth, which is easier to stamp on. But if you have something you want to stamp on that has already been washed, you could simply iron it first and even use starch if you wanted to.

You will see that I ended up making a tape handle for my stamps that came mounted on a very thin acrylic backing, so it was easier to hold on to and kept my fingers out of the paint.
Part 1 Snowflake Onesie

Stamping the second layer of the Snowflake onsie.
Part 2 of the Snowflake Onesie

The third Onesie, was a Fall theme. The leaf stamp used was a stamp my daughter made in school when she was 12 (LOL) and I knew she would recognize it. The Acorn was from a foam block that had Thanksgiving icons on it. The berries were stamped with the blunt end of a fine point sharpie marker, since my leaves and acorn were not centered, I felt I needed those berries for balance. I also used a fine paint brush to added the dark brown paint to the top of the acorn in a criss cross pattern, outline and as accents on the acorn. I also stamped a frog and the leaf on the cuff area of the sleeves.

20130120-191511.jpg

The last Onesie was stamped in a Christmas theme with Holly leaves and Berries. I ended up cutting the stamp apart by the time I got to stamping cards with the extra paint.
Christmas Holly Onsie

Cards made using the left over paint from the onesie projects. The acrylic paint leaves a very matte finish, which I think is very interesting for a different look.
Cards stamped with Acrylic Paint

I hung the Onesies up to dry on the stove hood with the tape used to hold them down to the counter.

20130120-233323.jpg

To set the paint, I ironed the onesies.
Iron the Onesies

The onesies when they came out of the washer.

20130121-000825.jpg

The onesies when they came out of the dryer. Eeeeeee! (happy sound) LOL

20130121-000947.jpg